Thursday, June 20, 2013

The Butterfly in Your Head

We all know the expression: "As Above, So Below." Nothing is more so in the human body. And certainly the reverse is true too: as below, so above. This post is about the sphenoid bone, which came about first as an observation of another human being, and then formed as an idea that wanted to be expressed while I was semi-awake on a weekend morning and very vividly felt how the subtle adjustment of my head on my pillow produced an equally subtle (but very felt) adjustment in my sacrum.

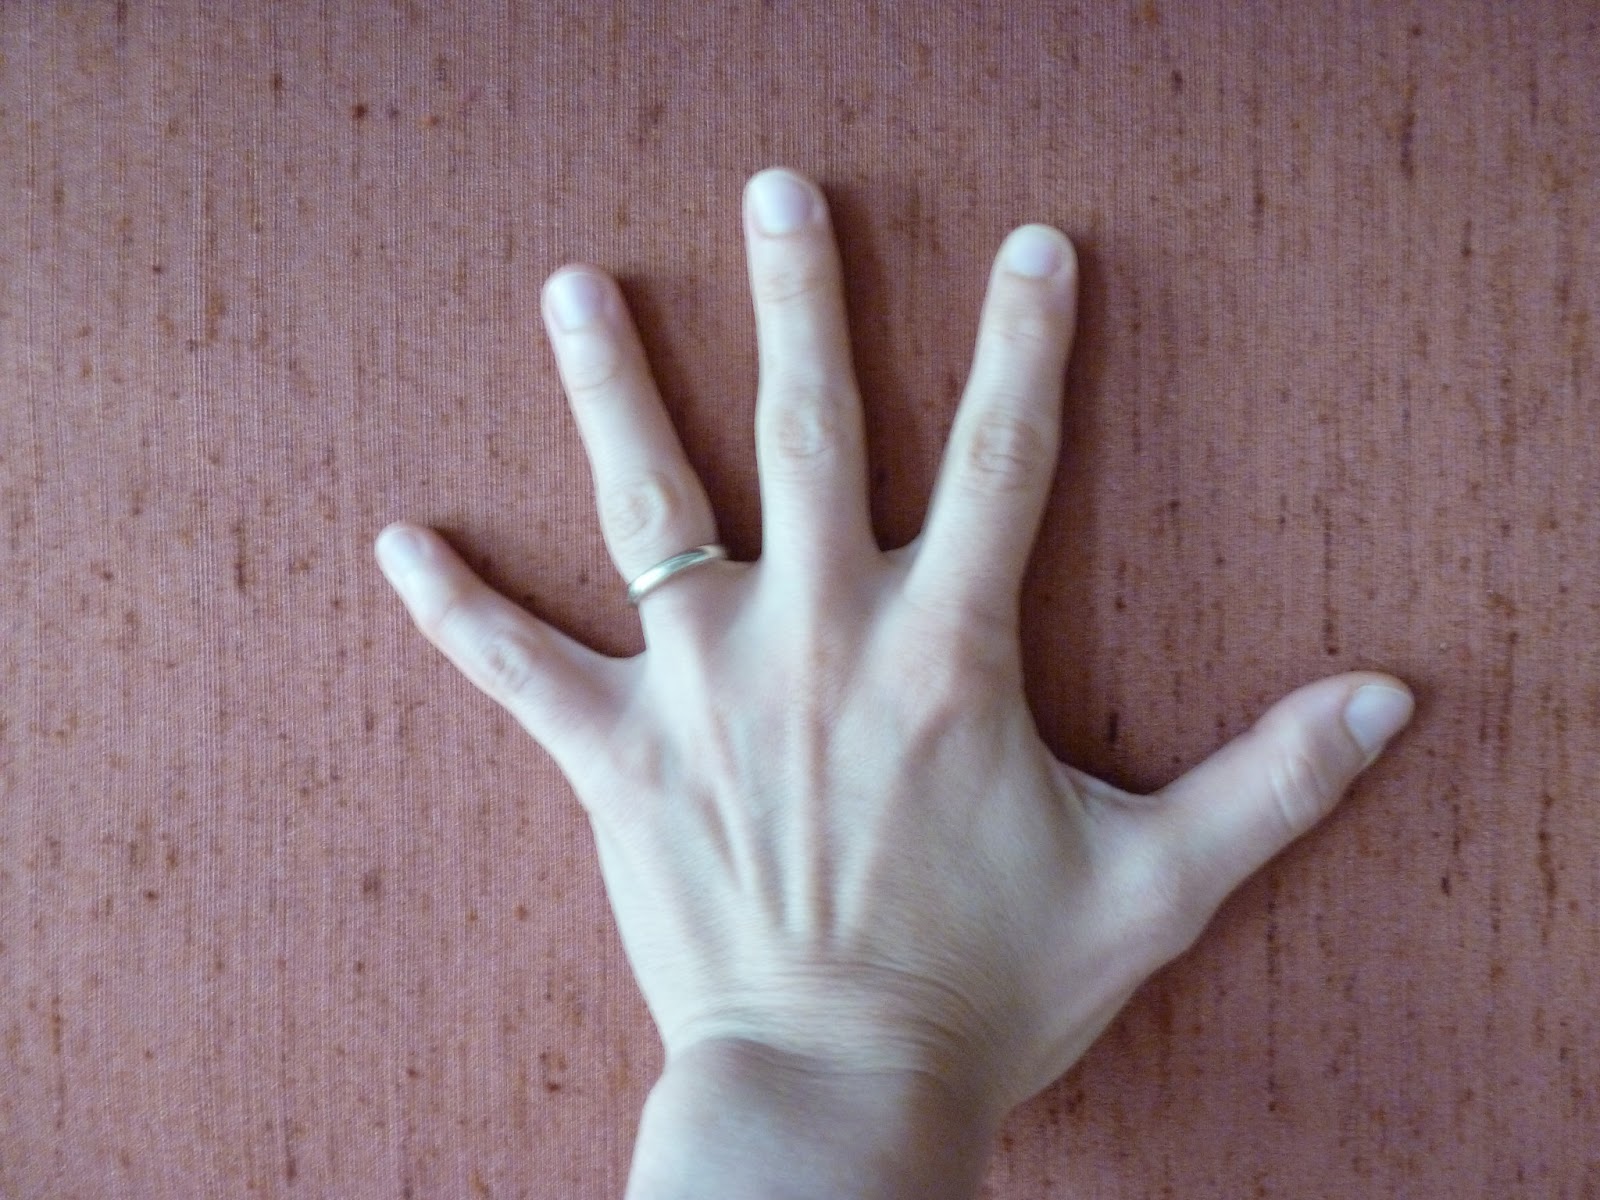
The sphenoid is an amazingly beautiful bone inside your skull, which makes up the anterior base of the cranium, and sits just above the upper soft palate. It is shaped like a butterfly or a like a bat or a small bird with outstretched wings. Here is a visual:
Rotating sphenoid! From http://commons.wikimedia.org/wiki/File:Rotation_sphenoid_bone.gif.
Impressive? Mind-blowing? I thought so... Here is a video of animated skull anatomy if you are further interested in visualizing.

This bone is amazing on many levels: it articulates with all the other bones in your cranium, holding them together like a keystone in an arch (but upside down). It is the center of gravity in the head and its position and ability to rock gently (more on that in a moment) are critical to overall health and well-being. The sphenoid—which means a wedge; and is another way to think of a keystone—is the area where the nerves leave the brain to connect with the spinal column and the lower spine. This bone also houses the pituitary gland, is close to the ears and has the nerves of the eyes passing through it. The pituitary controls the functions of all other endocrine glands.

On a skeletal and fascial level, the sphenoid connects to the sacrum first via the the sphenobasilar joint (the joint of the sphenoid and the occipital bone, i.e. the base of your skull), then through the atlanto-occipital joint where the atlas (first vertebra) and your skull meet, down through all the other vertebrae of the spine to the sacrum. Through these links, the sphenoid and sacrum function as unit.

Just as the sacrum rocks forward (nutation; into the body) and back (counter-nutation), the sphenoid exhibits a subtle pulsing that can be quietly experienced and resembles bird's or butterfly's wings flexing forward and back. Here is a video of this mesmerizing motion. This connection between the motion of the sacrum and the sphenoid is the basis for craniosacral therapy. Further, this approach talks not only about a fascial and skeletal connection between the sphenoid on top of the spine and the sacrum at the base of the spine, but of a deeper connection via the membrane system surrounding the brain and the spinal cord and the cerebrospinal fluid. The movement of the cerebrospinal fluid and the membrane system can be felt as a tidal motion, a kind of welling and receding which is called the craniosacral rhythm.

What does any of this have to do with your everyday well-being and your practice? Here it goes.

I often tell my yoga students to stop clenching their teeth and stop doing the pose with their face. Besides being funny, the above makes it clear that if your teeth are grinding and your jaw is tense, not only can this lead to TMJ and other neck issues, but the sphenoid and everything all the way down to the sacrum will be gripping as well and you are quite effectively locking yourself out from your core intelligence. Being tense in the eyes, jaw, throat and neck, and having poor head posture (such as forward head, rigidly holding the head still as in meditation or in front of a computer) disrupts the pulsing of the sphenoid and cuts/disconnects your head from your spine and the rest of your body.

Simply, clenching your teeth means you are clenching your butt, which can explain your low back pain, sacroiliac (SI) joint issues, and the like. The sphenoid and the sacrum quite simply mirror each other.

What can you do? One would be to soften. Close your eyes and let go of the mask of your face, softening your skin, your hair, making space between the upper and lower teeth, quieting the hands and the feet. Once you access that space (and I mean this literally), I think you will be surprised to feel the subtle movement of your head as it tries to balance on top of your neck and the internal movements of being human (heart beat, breath, gas, etc.). Remember, the more you hold yourself physically still, the more you are grasping. As you sit quietly, do mini horizontal figure 8 (or infinity signs, if you wish) movements with the tips of your nose, as if with a tiny paintbrush.

Breathe! As you inhale, imagine and allow the inside of the mouth to expand, the soft palate to widen and broaden. As you exhale, think of the soft palate gently drawing in and up, gently massaging the sphenoid above it and coaxing it to resume its pulse.

Finally, smile with your neck (follow the link for detailed description)!

Becoming aware of your sphenoid and integrating this knowledge into your life and practice is reorganization of your embodiment from the core outwards!

Thank you for reading!

Thursday, May 30, 2013

What Knife-Hand Strike Can Tell Us About Hand/Wrist Alignment?

One of the things that we are concerned with in yoga is creating space: space in the flesh body, space in the mind body, space in the emotional body, space for being... It is also taken as a given that the more space, the better.

I am certainly a space enthusiast. I love to spread my toes, for example, and have found that the more I am able to do funny things with my toes, the more ease I find in my hips. The same attitude is largely applied to our hands, regardless of whether we weight-bear on them--as in down dog, handstands, or arm balances--or not, as in warrior 1 or 2 and related poses. We hear over and over again: spread the fingers!

And that's fine, but up to a point. As with anything, yoga is about striking a balance--neither underdoing, nor overdoing. And I think that the finger spreading tends towards the overdoing, especially on the pinky finger side of the hand. What do I mean by that?

Overspreading the pinky/little finger actually creates compression in the outer wrist and enough repetition (i.e. regular yoga practice) can lead to injury in the TFCC (triangular fibrocartilage complex). Say w-hat? Said simply, the wrist is a complex structure, as delicate and exquisite as it can be lethal depending on how you choose to use it. The wrist joint is actually a collection of many bones and joints. Here is a nice visual of the TFCC:
TFCC from the excellent http://classes.kumc.edu/sah/resources/handkines/ligaments/wvsartgroup.htm, showing the major structures in the wrist that can be affected by overspreading the pinky. This is palmar perspective: as if you are looking at someone's palm. The thumb is to the left of the screen, the pinky to the right.
Here is a visual of what I mean by overspreading:

This is my hand. It's as the image above, but the palm is turned down. If I flipped my palm up to face you, the thumb side will be to the left, the little finger to the right.


To me, I've overspread my pinky finger, when it is not lined up with my 5th metacarpal (the outer fleshy part of my hand, also known as the knife edge). So, when I spread my little finger in the this manner, I am actually taking space away from the outer wrist and causing pinching around the articular disc, meniscus homolog, and ulnar collateral ligament; in a sense, the ulna (the forearm bone on the little finger side of the hand) rubs against the triquetrum carpal bone. Here another image to help you locate the triquetrum, where it is labeled:

Triquetrum, shaded in blue from http://classes.kumc.edu/sah/resources/handkines/bone/triquetrum.html. This is palmar perspective: as if you are looking at someone's palm. The thumb is to the left of the screen, the pinky to the right.
How can you know whether you are overspreading the pinky? To me, it's all about awareness and paying attention. With your hand in the air, spread your pinky as much to the side as you can and pay attention to what you feel in your outer wrist but also in the back of your neck and top of the shoulder blade. Do you feel less space in your outer wrist and a tightening in your upper back/neck (I think that would be your levator scapula muscle, quite the villain if you ask me). Also, if your outer wrist is too bunchy and wrinkled in comparison to the rest of your hand/wrist, you are probably overspreading the pinky.

So, what is an optimal spread of the pinky? This is where the knife-hand strike comes in, or more commonly known as the karate chop. (As a caveat, here is an article on why the karate chop is a useful tool to have in your bag of tricks.) In a karate chop hand, the knife edge of the hand and the pinky are lined up in a straight line (as far as anything in the human body is straight), which creates stability along the back line of the arm. We've all seen bricks being shattered with a knife-hand strike.

The pinky is associated with the Deep Back Arm Line, which includes your triceps and rotator cuff muscles. The rotator cuff muscles do contribute to movement of the arm bone, but they have the important function to stabilize the head of the armbone in the shallow socket of the shoulder blade while the armbone is in motion. You can feel this stability simply by taking your arms out to the side but still in the front plane of the body (with the palms facing forward and the hands slightly above shoulder level; the latter helps with releasing your upper traps), so that the knife edge of your hand and your outer forearm are pointing down toward the floor. Experiment with overspreading the pinky towards the floor (so that your outer wrist bends or kinks if you wish) and lining up the pinky with the knife edge of your palm, so that the outer wrist is stable and smooth. Although overspreading the pinky does create engagement, it feels more like gripping and muscles along the arms either overwork or underwork. It's kind of like creating a kink in a hose, the energy stops flowing smoothly. When the pinky lines up with the knife edge of the hand, there is space, but there is also stability, and you can pulse the energy along the deep back arm line: drawing from the pinky through the triceps and into the rotator cuff muscles, as you extend out from the shoulder blades through the pinkies. Further, when the pinky overspreads to the side, it's more likely that the mound of the index finger will have trouble connecting with the floor, which by definition will put pressure on the outer wrist.

Let me know what you think and share your experience. Thanks for reading!

Here are a couple of photos of what is an optimal spread of the pinky for me. Do you notice the difference with the image above? The little finger and the fleshy outer part of my palm are on a nice continuous line.


Wednesday, May 15, 2013

How Are Your Groins Connected to Your Humanity?

"The groins are of great importance for humans because their full extension creates the upright posture unique to our species. In a sense, when we are not balanced and stable through the groins, we're not fully human."
-Arthur Kilmurray

The groins are fascinating territory in the human body. Not technically an anatomical term, the groins are broadly the area in the body where the legs and the torso meet or fold into each other, a juncture where we like to keep our junk. It's an area of great hoarding, a veritable junkyard, a treasure basement to rummage through with glee and fascination.

Anatomically speaking, the groins are broadly described to include the 5 adductor or inner thigh muscles (lower inner groin); the iliopsoas complex (upper inner groin); and the part of the quads (rectus femoris) that acts on the knee (as in straightening it) and the hip (as in flexing it) as well as the sartorius and the tensor fascia latae. To me, the groins can be broadened to include any myofascial structure involved in the articulation or interaction between the leg bones and the pelvis, and therefore, by proxy, the sacrum and the spine. So, for example, the hamstrings can be thought of as the back groin--they cross and act upon the hip and the knee joints and are the antagonists to the quads mentioned above.I would include the glutes and the piriformis too.

Opening and balancing the groins is a lifelong practice, which requires utmost patience, gentle dedication, thoughtful awareness, less teeth grinding, less sitting (or should I say slouching), a willingness to do exactly the opposite of what you think you know or should do, an explorer's mind, to name but a few qualities. I am sure you can add to the list based on your experience. 

What does it mean to have open or balanced groins? According to Kilmurray, a body is open when it allows bodily fluids and energy to flow freely through, in, and out of it. This means that the bones must be centered in relation to each other, so that they can channel the energy of gravity and allow the various bodily systems to function efficiently in conjunction with the force of gravity. This also means that muscles will work optimally without unnecessary tension and the organ body will be supported rather than encumbered or collapsed.

What does this mean in practice? The short answer to this question is that to cultivate balanced and spacious groins we must do the work of separating the legs from the pelvis and differentiating these areas on a psychosomatic level, so that we can quite literally allow for the free flow of information between the legs (our connection to the earth: a fundamental and non-negotiable connection) and the rest of the body; in other words, so that we can be grounded, which is what allows freedom in movement and in self. 

Groins often feel anything but open. They feel bunched up, gummed up, glued, stuck, tight, gripping, sore, bulging, thick, dense, insert appropriate groin descriptor here.

But what does this concretely mean in practice? Below are a few examples of ideas that you can work with in a variety of poses:
  • In any pose, think of allowing the very top of the thigh bone, where it feeds into the hip, to settle into the back of the leg/hamstrings. If you try to this muscularly, you will achieve the opposite effect. Think of your hamstrings broadening, like a hammock receiving the thigh bone. It's more about becoming aware of that area and realizing if you are holding any (residual) gripping (for example in the gluteal fold, where the hammies and buttocks meet; also affectionately known as the butthigh or thass area), which might prevent you from releasing the thigh bone into the back of the hip socket. It's not about pressing with the front of the thigh into the back of the thigh, it's about mindful direction. You can do this in constructive rest position (see image below), in lunge (for both legs!), any of the warrior poses, etc.
Constructive Rest Position from http://alexandertechnique.com/constructiverest/
  • Partial "supported" squat: You can do this with a chair without arm rests (such as a folding chair). Sit at the edge of the chair, with the thigh bones forming a comfortable V shape: not too wide, not too close together. Track your toes and knees in the trajectory of your thigh bones (and subsequently adjust if there is any discomfort in the knees), have your shins vertical with the floor. From there, take your hands behind you on the chair and lift the pelvis away from the thigh bones, as you let them drop away from the frontal surface of the thighs (see bullet point above). See if you can maintain this sense of separation as you sit back on the chair. From there, with the hands holding the edges of the chair seat and supporting you, you can take the pelvis away from the edge of the chair and slowly and repeatedly squat down towards the floor, becoming aware of the tops of the thighs descending and the pelvis ascending, imagining and feeling tremendous space between the surface of the hip crease and the thigh bone. If you get into it, it can be quite profound. It will also make you realize why "regular" sitting (excuse me, slouching) is so detrimental to our health and well-being: it literally cuts off communication between the lower and upper body.
  • In poses like baddha konasana (bound angle) and supta bada konasana (supine bound angle), please stop thinking of your knees getting to the floor. Rather, think (again) of letting the thigh bones move into the backs of the legs in addition to moving them away from each other laterally (you can also think of the inner surface of the pelvic bones—the ilia—expanding and broadening).
  • In poses like parsvottonasana (pyramid), parivrtta trikonasana (revolved triangle) and urdhva prasarita ekapadasana (UPEP or standing splits) the inner thighs tend to collapse onto each other. What I find very helpful here, especially in the back (or lifted) leg) is to create space between that side of the pubis and the upper inner thigh.
  • This is a fun one and will help you with differentiating your thigh bone from your hip point in any number of poses (for example, vrksasana or tree pose, padangustasana B or extended hand to foot pose, baddha konasana, and the like): from standing, take your hands on your hips, then lift one foot off of the floor and look at the bottom of this foot as if to see if you stepped on gum, while keeping that hip point facing straight ahead and taking care not to hike it up.
  • Sitting on tennis balls: the possibilities here are beyond the scope of this post. Everything I learned about tennis balls and how to use them for myofascial release and space creation I learned from the fabulous Megan Davis and Jenny Otto
The above just scratches the surface of how you can begin to have a meaningful relationship with your groins. There are a myriad of ways to do that. If you have a specific question, feel free to drop me a line. If you have a tip, I would love to hear it. If this was helpful, spread the word. If you are interested in a topic and would like me to write about it, I would love to hear from you. 
Groinfully yours,
Anna

Thursday, May 2, 2013

Downward-Facing Dog Exploratorium

Downward-facing dog is one of those ubiquitous yoga poses, spanning styles, methods, disciplines, and approaches. It is a defining (visual) symbol of contemporary yoga. I am a bit tempted to go on a bit here and talk about down dog as a concept deserving its rightful place in yoga's ever-evolving polysemic lexicon (meaning a vocabulary of words which have many and different meanings depending on the context, courtesy of the always thoughtful and thought provoking Matthew Remski), but I'll confine myself to what usually fascinates me in my practice and that is the alignment of the human flesh in this pose--a pose that is as basic as it is wildly advanced.

In particular, the front end of the pose is where it gets especially interesting: the arms and the hands. Practicing down dog in particular and asana in general requires using your hands and arms and weight-bearing on them. This coupled with contemporary lifestyle habits and patterns is often a recipe for sore wrists, misused shoulders, and jammed necks, to name but a few abominations.

Tom Myers puts it very well when he says that "the arms have to control the finest instrument the world has ever known—the human hand—at one end, and are anchored into the head, neck, upper spine, ribs, low back, hips, sacrum, and even arguably the femurs at their other end." (Myers 2012). In other words, a lot is at stake when we practice down dog or any other pose that derives from it (plank, low pushup, handstand, arm balances, side plank...). Further, "the arms are highly complicated bits of machinery, very handy accoutrements to our body’s repertoire, and amenable to the poetry of bird’s wings and nonverbal haiku" (Ibid.). Whereas the legs lead us to the world and into our environment, our arms and hands bring the world to us.

Tom Myers identifies 4 arm lines, presented very schematically below:
  • Deep Front Arm Line connecting pec minor (tight chest, anyone?)-biceps-supinators (radius bone rotators)-thumb muscles
  • Superficial Front Arm Line connecting pec major-latissimus-teres major-hand/wrist flexors (undersides of forearm in down dog)-palm surface of the fingers
  • Deep Back Arm Line connecting rhomboids-levator (pesky villain)-rotator cuff muscles-triceps-pinky finger muscles
  • Superficial Back Arm Line: traps-deltoid-hand/wrist extensors (tops of forearm in down dog)-back/top of the hand
Myers further compares the arms lines as the four aspects of a bird's wing, with the superficial and deep front arm lines being the bottom of the wing and the superficial and deep back arm lines being the top of the wing. In this cute video on How Wings Work, we are told that extending the wing fully creates a smooth surface for flying. We are also told that the bird's first finger allows it to fly slow speed without falling out of the air.

Where am I going with this? What I am trying to say is that the arm lines (especially the front arm lines vs. the back arm lines) need to be balanced for down dog to be an integrated pose rather than overusing the back arm lines at the expense of the front arm lines. The underside of the wrist—where a lot of us collapse in down dog—is called the volar surface of the wrist, which means the hollow of the hand and it is etymologically rooted in the Latin for "fly."

In terms of the lines above, my take is this:
  • The Superficial Back Arm Line is the line that tends to overwork and grip in down dog, starting with the upper traps, the deltoids, the tops of the forearms and hands. The one part of this line that is often asleep and needs to be nudged is the mid and lower fibers of the trapezius muscles which have the wonderful function to take the inner edges of your shoulder blades down your back and thus create a lot of freedom at the base of the neck/tops of the shoulders. But we'll get to that in a moment.
  • The Superficial Front Arm Line is your flying line: if the undersides of the forearms and palmar surface of the hands engage isometrically (you think of the action but you are not actually doing it), this will keep the tunnel in your carpal tunnel, will give space for the ligaments that maintain the arch of the hand to do their work and also begin to take the outer edge of your shoulder blades up (away from the floor), like bird wings spreading and getting ready to fly (with the help of the lats and the teres major).
    (This is a good place for a caveat: in many yoga classes, students are instructed to take the outer edges of the shoulder blades toward the floor in down dog and wrap them towards the outer armpits with the idea of lifting the inner armpits; what I am describing here disagrees with this instruction. I feel that this "wrap" is what the wonderful Barbara Benagh calls "borrowing" without giving back: like shortening your bottom ribs in parsvokonasana (side angle pose) and bowing out the top to allow your hand to reach the floor or like using the mobile T12-L1 juncture in your spine and pretend that your top chest is open. Further, if you take your blades off your back in this way, how can you then take them down your back?)
As I said above, my take is that the Superficial Back Arm Line tends to overwork in down dog due to tight/overused extensors (the tops of the forearms, i.e. the hairy part of your forearm; these are the muscles that help you gesture stop with your arm and hand, which is the same position as in down dog but in a different spatial orientation if you think about it).


Further, modern humans tend to have weak/underused hand/wrist flexors (the underside of the forearm; these are the muscles that help you make a fist).


To add to all this, very often when we go to yoga class, we are told to take the chest down towards the floor or towards the thighs and to aim to touch the floor with our forehead. (I know, I am maybe exaggerating a bit, but I sometimes think that to make a point, it is sometimes helpful to exaggerate, and no, I am not saying that the chest should not be open in down dog.) This, however, tends to disengage the front arm lines and collapses the whole endeavor towards the floor and you are quite literally subsumed by gravity and stuck to the floor with any number of unpleasantries such as achy wrists or elbows, a pinch in your shoulders around the tops of the deltoids, and a neck that feels heavy and hard like lead. Further, if we go with the bird wing metaphor, you have to lift from below (the front arm lines or bottom of wing) in order to be able to fly.

What about the other two lines:
  • The Deep Front Arm Line is your stabilizing/weight-bearing line in the front, in the sense that the thumb connects to the radius (that's the forearm bone on your thumb side), which in turn connects to the humerus (upper arm bone), which connects to the ribcage in the front via the pec minor. The front needs to engage and draw up so that you don't fall.
  • The Deep Back Arm Line is your stabilizing line in the back, in the sense that the pinky finger connects to the humerus (via the ulna—that's the forearm bone on your pinky side), which connects to the shoulder blade via the rotator cuff, which connects to the spine and neck via the rhomboids and the levator scapula respectively. 

Further, for your down dog to "fly" out of gravity's lovingly smothering embrace, your wings need to be fully extended and lined up as per the bird wing video above. In a human, lining up your joints helps muscles to work optimally with/against gravity, decreases drag and inefficiency along the myofascial lines of the body, and facilitates the flow of energy between the joints (not to be confused with hyper-extension at the elbow joints though: locking your elbows stops the conversation between your hands and your shoulders for example in the same way that locked knees destabilize your hips because they have no feedback from the feet and the earth beneath them).

How does this all work in asana? Please read this first, reflect on it, and then try it in action.

Have a block handy. Start on hands and knees. Come down onto your forearms and place the block wide-side between your elbows on the floor. Then, position your forearms in such a way that you are not holding the block with the fleshy part of your forearms but really with the bony protrusion at the elbow (which is really the inner rounded end of your upper arm bone, the humerus). If you do this well, your forearms will be parallel with each other, rather than narrower at the wrists. Hips will be over your knees (or a bit behind to keep the torso long), low belly lifting towards the spine, torso long, fingers spread, head/neck neutral so that the back of your neck is not shortened. Press down through your palms to lift your elbows and the block just a couple of inches off of the floor (leave the knees on the floor for the first round and then experiment with lifting the knees off of the floor and pressing back through the hips like you would in down dog). Now, the arm lines, which are cumulative (in the sense that the actions build on each other and don't cancel each other out). 
  • First, press down through the thumb pad and index finger knuckles and draw energy up along the inner forearms, the biceps and right where the biceps disappear under the deltoids to create a lift in the inner armpit and stability in your pose. (Deep Front Arm Line for establishing your base and stability from the front/bottom)
  • Second, draw up from the entire palmar surface of your hands: the more you spread this action, the better; hopefully, you will feel the undersides of the forearms begin to engage and the arches of the hands begin to emerge and create an energetic lift away from the floor. Remember, the knuckles of the fingers--where what we perceive as fingers meet the palm--are rooted to the floor. The more you direct the weight into the front of the palm, the more space and lift you will create in the bottom of the wrist/carpal tunnel. Now, think of taking the outer edges of your shoulder blades away from the floor and onto your back (Superficial Front Arm Line, or lifting your wings)
  • Third, draw energy up into your triceps from the fleshy part of your pinky "finger" (5th metacarpal) while keeping it firmly grounded, and think of plugging/connecting your triceps into/with the muscles connecting your shoulder blade and your arm bone (the rotator cuff). Hopefully, you will feel the bottom tips of the blades start telling you things as a result :). (Deep Back Arm Line for establishing stability from the back/top)
  • Finally, think of length and space in the Superficial Back Arm Line (or spreading your wings). Lift your collarbones away from the floor to free the upper traps, then lengthen from the deltoids through the tops of the forearms and fingers, like you are exhaling from under your finger nails. At the same time, think of the inner edges of the blades sliding down your back (or up towards your hips if you are a spatial person) to awaken the mid-low traps. You are still doing 1-3 and holding the block, right? :)
Come down and rest and repeat a couple of more times, progressively straightening the arms in the process, without ever locking your elbows (yes, it can be done even with the block). Can you feel how this is creating more balance between the undersides and the tops of the forearms? One way to gauge if you are on the right track is to bring your attention to your elbows and create an energetic balance between the elbow crease and the elbow point, so that the crease is not overstretched and the point is not digging in. Keep space between the teeth and your tongue relaxed. Then, of course, try this in full down dog, plank, handstand, your choice :).

Questions? Feel free to drop me a line or leave a comment!

Wednesday, April 24, 2013

Bands to the Aid

Up until now, a lot of my posts have alluded to or discussed myofascial (myo=muscle, fascia=connective tissue) lines or tracks in the body, largely based on the work of Myers (2008, 2e), and how they integrate into asana practice or mindful movement and participation in life. These lines are vertical or longitudinal and they are also functional in the sense that they relate primarily to movement.

There are, however, other fascial 'bands' or 'straps' that run horizontally around and through the body, which, as you shall see, are related to (familiar) yoga concepts and are instrumental for healthy alignment and integrated movement in asana practice. My sources for this post are The Endless Web: Fascial Anatomy and Physical Reality (Schultz, R. L., and Feitis, R., 1996, e-book), a workshop and presentation by Doug Keller (April 21, 2012) at the Fairfax location of Sun and Moon yoga, and my own practice and experience.

While each body is unique in shape, size, proportion, and contour, that is, some of what constitutes one's gross and energetic silhouette, all bodies have patterns that are common to them. These retinaculae or bands/straps (retinaculum is the single and comes from the Latin verb retinere (to retain)) run horizontally around the body "where there are no traditional anatomical connections from front to back" (Schultz, R. L., and Feitis, R., 1996). They function as retainers holding in the soft tissue and are relatively independent of muscle tissue.

When I think of these bands, I think of an oak barrel (the body and its contents) and the hoops that hold it together (the bands), with the small but important difference that humans move and oak barrels don't (at least not in the same way). In movement, these retainers, which resemble tendons and ligaments in structure, seems to run not only around but through the body like planes, segmenting the human body in this way and giving it its distinct human shape. Relative to the segments that the bands' existence brings about/begets, the bands themselves are relatively inflexible and have the quality of breaking the wave (or flow) of movement, thus providing stability for both movement and breath.

So, what are these bands? There are seven of them:

1. Pubic band: The lowest band in the torso, which extends from the pubic bone in front across the groin around the hip bones (the greater trochanter of the femur), and across the buttocks, ending at the junction of the sacrum and coccyx. Think pelvic floor/ diaphragm, mula bandha, muladhara chakra, piriformis, earth, hinge between sacrum and tailbone. (Hinges are discussed below.)
2. Inguinal band: The band across the lower abdomen. It connects the two bony projections of the pelvic bones in front (the anterior superior spines of the ilia or hip points). It usually dips slightly downward in front, like an inverted arch, resembling an internal jock strap or chastity belt. Its lower margin tends to include the inguinal ligament, connecting the band downward to the region of the pubic bone. This band extends laterally along the upper margin of the large wings of the pelvic bones (ilia), ending at the lumbosacral junction. Think sacrum, swadhisthana chakra, fire+water, hinge between low back and sacrum, uddiyana bandha/lower abdomen.
3. Belly/umbilical band: The third band crosses the abdomen and is perhaps the most variable in location. It may cross at the umbilicus, or it may lie midway between the umbilicus and the mid-costal arch (tying together the two sides of the costal arch). In either case, it will extend laterally to form an  arch across the abdomen to the lower ribs on each side-particularly to the free tip of the eleventh rib. It travels backward along the lower ribs, ending at the junction of the thoracic and lumbar vertebrae. Think navel, manipura chakra, solar plexus, fire, uddiyana bandha/upper abdomen, hinge between chest and low back.
4. Chest band: The fourth band is in the area just below the nipples and is visually the most apparent. It is usually a non-moving depressed area on the chest; the skin seems glued down onto the ribs and muscle. Laterally, it extends along the lower border of the pectoralis major, across the mid-lateral chest, and down the lateral margin of the latissimus dorsi where it begins to run parallel to the scapula toward the arm. The strap appears to tie the lower tip of the scapula to the back ribs and ends at the dorsal hinge of the spine (T4-T5). When this strap is pronounced, there is not only a depressed mid-chest, but an inability to expand the ribs sideways in breathing. Think heart, lungs, anahata chakra, water, diaphragm, bottom tips of shoulder blades, dorsal hinge (back of heart).
5. Collar band: The fifth strap at the shoulders involves the clavicle and is part of the tissue gluing the clavicle to the first and second ribs in front. It can be felt as a pad of tissue just below and deep to the collar bone (clavicle). It extends laterally to the tip of the shoulder, with some fibers fanning down into the armpit. The strap continues toward the back on the inside and outside of the upper border of the shoulder blade (scapula), and ends at the junction of cervical and thoracic vertebrae. Think throat, vishuddha chakra, air+water, shoulder girdle, hinge between upper back and neck (C7).
6. Chin band: The area below the chin is an area of concentration of fibers and padding which includes the hyoid bone and the base of the jaw, passing just below the ear, and ending where the base of the skull joins the first cervical vertebra (atlas). Think ajna chakra, air, neck, lower brain, hinge between neck and head.
7. Eye band: The topmost band is the most difficult to visualize. It originates on the bridge of the nose, travels across the eye sockets and above the ears, and ends at the back of the skull just above the occipital crest (the bump at the back of the skull). Think sahasraha chakra, air, upper brain, skull, skull hinge/sphenoid.

Why are these important?
These bands or retainers manifest themselves where the spine's curves reverse direction, that is, where the vertebral bodies change shape and function and where, therefore, there is the most potential for movement and thus the most tendency for overuse and injury. These bands attach to these hinge points in the spine to create stability, where we are the most vulnerable, the body creating its own genius way of keeping itself whole and integrated.

As the colored sections above indicate, these hinges and their bands are also associated and have a relationship with the chakras, commonly described as energy/life force/prana centers in the body. Anatomically, the chakras are situated just in front of the spine, where the autonomic or visceral nervous system lies (ANS), controlling and affecting things such as heart rate, digestion, respiratory rate, perspiration, salivation, sexual arousal, among other important functions. The hinges in the spine discussed above are associated with the most complex ANS activity. As Doug Keller eloquently puts it: "where there is ease of movement at these junctions, there is stimulation of nerve impulses that control metabolic activity; these are the points where the chakras express themselves through the nervous system, providing a continuum between physical and subtle" (Keller 2012).

How can we be informed by these latitudinal fascial bands in our asana practice? A comprehensive answer to this question is beyond the scope of this post, but simply being aware of their existence can be the beginning to mindfully integrating them into your own asana practice and to beginning your own personal quest to feel these bands and understand where the work lies in your body. For me, creating a lift along the frontal surface of my spine has done wonders for allowing me to integrate my pubic, inguinal, and belly bands, but this only came after I worked for quite some time on untucking my pelvis (as in a few years and an ongoing process). Smiling with my neck has been instrumental in aligning my collar, chin, and eye bands and showing me where I hold patterns that are useless and downright detrimental to my well-being. What about that well-known hinge where the low back ends and the upper back begins, the infamous T12-L1 juncture? I have had great experience with the following actions in my practice to alleviate pressure at this hinge and begin to stack my ribcage and my shoulder girdle on top of my pelvis (i.e. tadasana alignment): assuming things are all lined up below, draw the bottom of the breastbone (xyphoid process) into the body (not necessarily down), which in turn will allow you to expand/broaden the ribcage laterally, and then exhale through your upper traps draping them back and slightly down (without pulling your arms down).

Was that long enough for you? Me too. Peace out!

Tuesday, April 16, 2013

The seesaw principle and the deep front line

You are in yoga class in a standing pose with the front knee bent, as in virabhadrasana 1 or 2 (warrior) or parsvokonasana (side angle), and you hear the dreaded instruction: descend the top of the thigh bone down towards the floor. You try and one or more of the following happen: your front hip crease starts gripping and naggingly hisses at you that it's time to get out of this misery, and/or your back leg collapses down towards the floor, and/or gluteal muscles start overworking and causing pain in the sacroiliac (SI) joint or in the back of the pelvis. Sound familiar? Read on..

So, I recently spent a good chunk of my time on long flights going across the ocean to visit family and take a side trip to Rome. I wanted to find a way to keep the tops of my thigh bones rooted (in the back plane of the body) while sitting in the airplane seat and remembered the principle of the seesaw:
Seesaw from http://dsc.discovery.com/tv-shows/mythbusters/about-this-show/physics-of-seesaws.htm
In terms of anatomy and movement, the seesaw principle states that when one end of a bone (or body part) is moved in one direction, the other end of the bone is moved in the opposite direction (see Keller 2001). This is a particularly useful principle when addressing knee hyper-extension as shown in the image below:
Hyper-extended knee and seesaw principle from http://www.doyoga.com/book.pdf. Now, imagine both "seesaws" of the leg bones, moving in the opposite direction with the base of the thigh bone and the top of the shin bone becoming "light" and the top of the thigh bone and the base of the shin bone becoming "heavy" from the point of view of the seesaw mechanism and you will see how this principle can address knee hyper-extension and the postural issues resulting from it.
This is all very well in straight-legged poses/positions. What about when the knee is flexed as in one of the poses mentioned above or when sitting in an airplane seat? In my view, absolutely. So, back to sitting on airplanes: I placed one of those mini-pillows they give you on long flights under the base of my thigh bones, just above the backs of my knees, so that the tops of my thigh bones at the level of the hip creases were lower than the base of the thigh bones just above the kneecaps. It certainly made a difference for me.

Now, back to yoga poses where the knee is flexed. Next time you are in virabhadrasana 1 or 2 or parsvokonasana, instead of trying to press the top of your thigh bone down, which will very likely create some hardening in the hip crease area, try lifting the base of the thigh bone up from below (top back of the knee area or knee pit). You will most likely notice the top of your thigh bone descending into the sling of your hamstrings, even if just a bit. Further, this idea is especially helpful in poses where the knee is in even deeper flexion, such as virasana (hero), eka pada raja kapotasana (pigeon), padmasana (lotus), vrksasana (tree), to name a few. In this way, you will be creating much needed space in the back of the knee joint, helping your thigh bones set deeply into the hip socket, thus tapping into the sweetness of yoga asana practice, when movement is not stressing you out and creating physical, mental and emotional drag.

Going deeper, I think this idea is also useful with regards to accessing the deep front or core line in these postures. If I think of lifting the base of the thigh bone up as described above, I am directly speaking to my core line via the popliteus, the back of the knee capsule, and the adductors (inner thighs), which in turn connect to my psoas complex and therefore my spine, my breath, and my heart above (see Myers, last page, figure 7) and deep compartment of the lower leg and the arches of the feet below. Long live the seesaw!

Tuesday, April 2, 2013

Turn the Key, or How to Optimize Your Shoulder Alignment

When talking about shoulder alignment in yoga classes, the practitioner most often hears about the upper arm bone (the humerus) and the shoulder blade (the scapula). It usually involves some kind of language which instructs the practitioner to take the arm bone in the back plane of the body with the aim of positioning/keeping/securing the shoulder blade onto the back, that is, it deals with movement/articulation in the glenohumeral, or shoulder, joint, the place where the upper arm bone and the shoulder blade meet. This is true regardless of whether you weight bear directly on your hands or "just" have to keep your arms up or out to the side for example. This is true irrespective of the type of pose: forward bend, backbend, twist, arm balance, etc. If the shoulder blade is not optimally positioned on your back, then something above or below it will take the brunt such as your neck and head, elbow, hand, upper spine, ribs, even hips and sacrum. Optimal position of the scapula is beyond the scope of this post and I will leave that to the expert voice of Tom Myers.

What I want to draw attention to is the other shoulder bone, the collarbone (or clavicle), which forms the other shoulder joint or the acromioclavicular (AC) joint, which is the junction between the clavicle and the acromion of the scapula. If this already sounds like gibberish, here is a visual:
Shoulder from http://orthoinfo.aaos.org/topic.cfm?topic=A00394
The collarbones are largely forgotten in yoga class, besides the occasional instruction to broaden them during centering. In my experience, they are key to shoulder alignment. And I use the word "key" on purpose. Because the etymological root of clavicle means "key." It comes from the Latin clavicula, meaning small key or bolt. Doug Keller first drew my attention to this connection, and although I was impressed, it took a bit of time for me to make further connections. The same etymology goes across languages: ключица (klyuchitsa) in Bulgarian, meaning key bone; Schlüsselbein in German, meaning key bone; etc. This is also where clé or clef (key) come from in French. So, knowing the etymology was the first step to greater understanding. On an intellectual level, I understood that somehow the AC joint was instrumental in optimizing shoulder alignment, and the clavicle was like the key in the lock that unlocks that potential. This also made me remember the "broaden the collarbones" instruction  and practice it in a variety of poses.

Then, a couple of weeks ago, I was in yoga class doing jathara parivartanasana, let's say, taking my legs to the right, trying to will my left outer shoulder blade to stay on the floor, when I heard the teacher say, "Broaden from the right collarbone through the left collarbone," and it just worked like a beauty. Bringing my awareness to the collarbones brought about easier and more refined alignment to the arm bone-shoulder blade complex:
Jathara parivartanasana: revolved abdomen pose, from http://home.comcast.net/~raoulsch/bwy/bwy_prac.htm
Needless to say, I remembered all that Doug Keller had said about the "key" bone and went about exploring enthusiastically in my practice. The following muscles attach to the clavicle: trapezium, deltoid, the SCM, the pec major, the subclavius, and the sternoclavicular (or sternohyoid) plus a couple of ligaments. This would make the clavicle a key bony station in at least 3 of the 4 arm lines (see Myers above) as well as the deep front line via the sternohyoid.

To be clear, I am not saying to ignore the arm bone-scapula (shoulder) joint. This is the joint that primarily determines shoulder positioning and alignment. But I do think that the clavicle and its articulation at the AC joint with the shoulder blade is nothing to sneeze at if you are seeking refinement and more optimal shoulder alignment in your practice. As Wikipedia says about the AC joint: "The AC joint allows the ability to raise the arm above the head. This joint functions as a pivot point (although technically it is a gliding synovial joint), acting like a strut to help with movement of the scapula resulting in a greater degree of arm rotation."

So, in practice, what has helped me is to think of absorbing the distal edges of my clavicles into the body, in essence articulating my AC joint, plugging the key into the lock and turning it, so that I can then open wide the door of the shoulder (arm bone-shoulder blade) joint. Like a waving lucky cat when its paw is raised and facing forward. Doing that lucky cat wave (with the elbow bent) and having the fingertips of your other hand on your clavicle will show you what I am talking about (try having the fingertips at different points of the clavicle, starting from the center, closest to the sternum and then moving out towards the shoulder blade to get a sense of how the clavicle is indeed like a key that turns into a lock). So, when you bring your awareness to the clavicle and articulate at the AC joint, you are creating the conditions for the top chest to spread, lift, and broaden and for the shallow shoulder joint to express the mobility that it is known for (at least in theory). Think about absorbing the edges of your collarbones into the body next time you do pincha mayurasana (forearm stand) or set up for urdhva dhanurasana (wheel) and see how it goes and whether it helps you with moving your shoulder blades more fully onto your back. Then, start turning the key in other poses as well and see what doors it opens for you.